Xcode Build Time Optimization
Emin Deniz · October 23, 2023 · 13 min read
Xcode Build Time Optimization
As a developer who has been working with Xcode for over 9 years, I frequently suffer due to features and aspects of that software. In my opinion, the worst is Xcode’s build time: it can take minutes, even hours, for large-scale projects. In this article, I will explain our Xcode pain points on the AutoScout24 iOS project and how we addressed them..
Improving the build time obviously means clearing up any problematic processes that take too much time. For each project, these processes can be different. I will try to explain how you can investigate and solve this issue in this article. I hope it will be helpful for you.
Introduction to basic concepts
Before starting into the findings, it’s better to focus on which time frames we can improve.
- Fetching time: fetching the source codes and required frameworks from dependency management tools (SPM or CocoaPods)
- Build time (Clean build): Build the Xcode project the first time after fetching or compiling after cleaning the Derived Data folder.
- Incremental build time: Building the project after changing a certain amount of code blocks. Xcode doesn’t try to compile everything if you only change a single code block; it only compiles the changed source file and files that needed that specific file (at least in theory).
Fetching time mostly depends on the bandwidth you have. So we can say that fetching time is not the focus of this article.
Understanding how Xcode builds a project
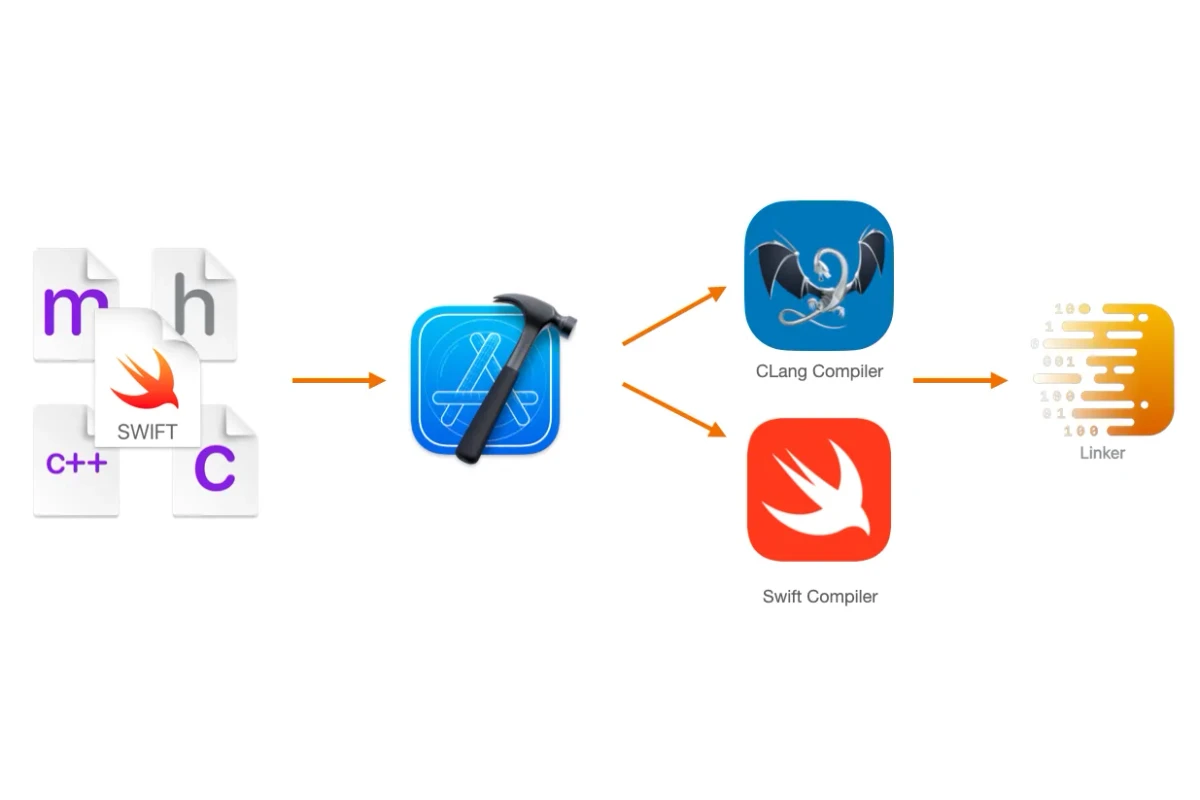
Before diving into the investigation let me explain how Xcode builds a project. Keep in mind that the Xcode build process is a highly complex topic and there can be some additional phases for some complex projects. I will try to explain it as simply as possible by showing the basic steps.
When you hit the build button here are the fundamental steps that happen:
- Xcode analyzes the project and creates a build plan.
- Xcode builds the framework that needs compiling.
- Xcode builds the resource files (like Storyboards, XIBs, etc.) that need compiling.
- Xcode builds the source files (Swift and Objective-C) that need compiling.
- Then Xcode links everything (frameworks, resources, and source files) together.
- Finally, it runs custom scripts if you have one.

Keep in mind that some of those steps can be run in parallel in Xcode. For the sake of simplicity, in this article, we assume those steps are serial.
Although almost all the phases are straightforward, you might wonder why we need an “Analyze & Build Plan” in the first phase and what it does. In this phase, Xcode decides what needs to be compiled in the simplest manner. You may ask ‘Shouldn’t everything be compiled on each build?’. The answer is, thankfully, no. Let’s assume you just changed a single line of code in a project with 10,000 Swift files. Recompiling everything is a waste of time because most of the files are not affected by this change. To understand this let’s get into a bit of detail.
When you implement a source file and build, Xcode use the related compiler (Swift compiler for swift files, CLang compiler for the rest of them.). After the compiling, it extracts linked objects. Linkers are precompiled and ready-to-use objects.
As you already know, we are importing some other source files or some other frameworks to our source files in both Swift and Objective-C. For example, let’s examine the diagram below. Class D imports Class C and Framework A. Class C imports Class A and Class B. As a result, Class D imported Class C & Framework A directly and it imported Class A & Class C indirectly.
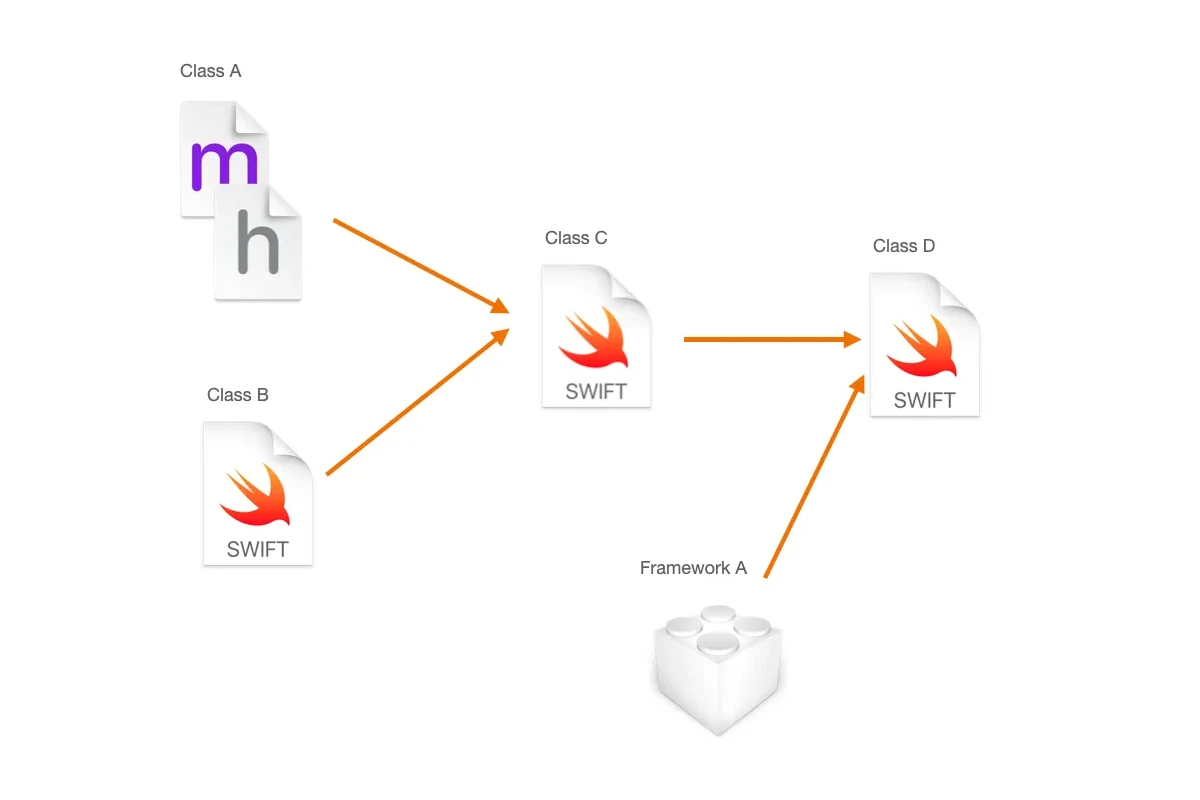
When you compile this project for the first time or compile after cleaning, Clang and Swift compile Class A and Class B then create the linkers. At this point Class C can use the linkers of Class A and Class B. After that Xcode compiles Class C to create linkers. Class D can use the linkers of Class C and Framework A now (assuming that Framework A already compiled and ready to use). Lastly Xcode compiles Class D.
After this clean compile, let’s see what happens if you change some files and build (incremental build) the project.
- If you change something in Class C, Xcode only needs to recompile Class C and Class D. Because the linkers of Class A and Class B are still valid.
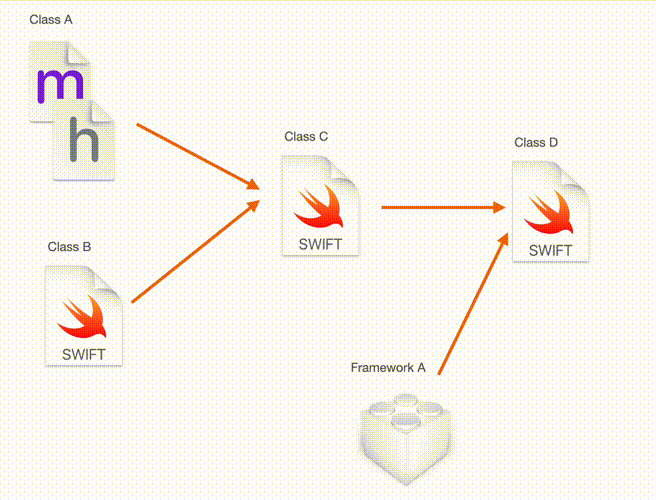
- If you change something in Class A, Xcode needs to recompile Class A, Class C, and Class D. Class B and Framework A’s linkers are still valid.
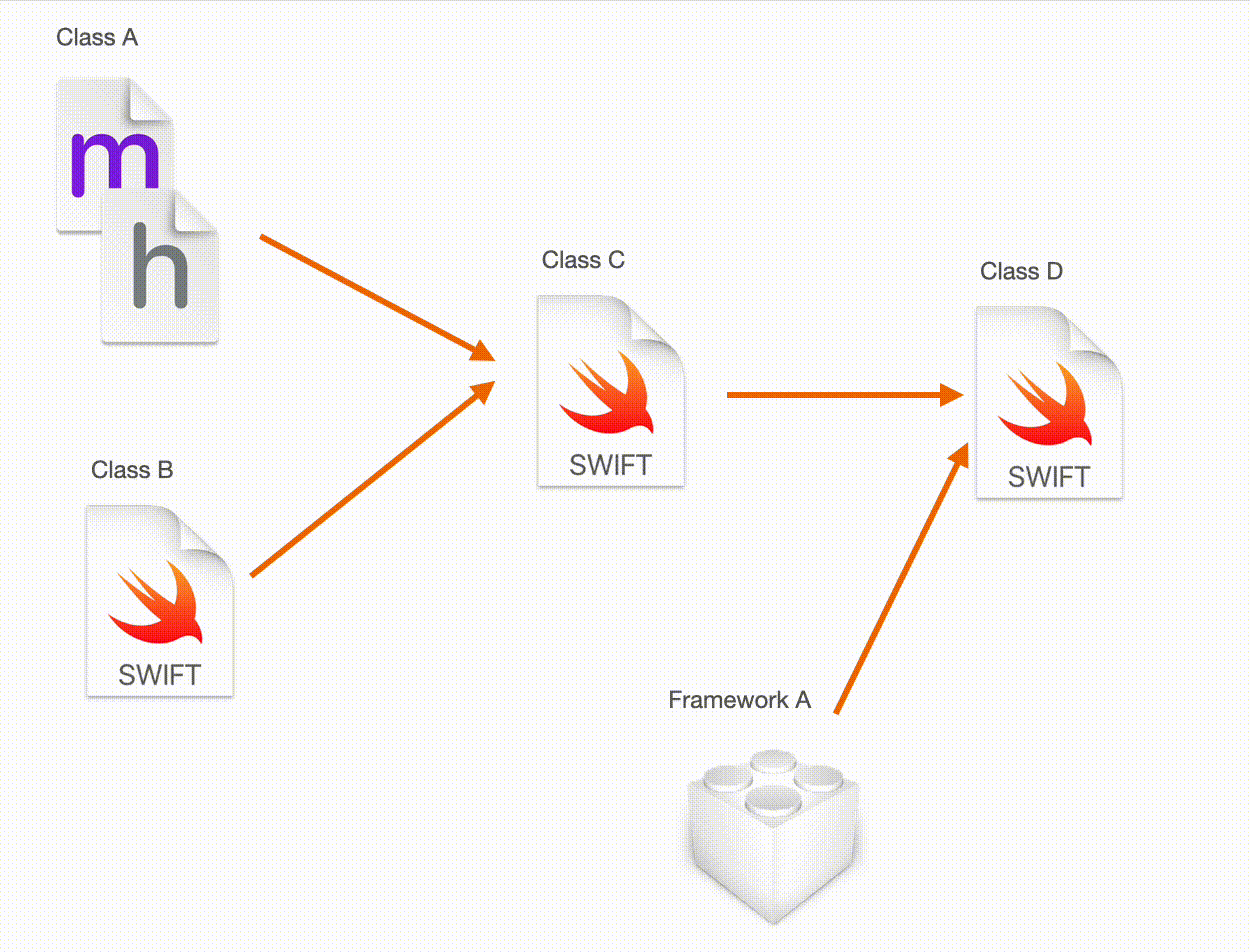
- If you change something in Class D, Xcode only needs to recompile Class D because the rest of the linkers are still valid.
I think you get the point 🙂 So “Analyze & Build Plan” phase tries to understand which files are changed and which other files are importing those files. As a result, Xcode understands what needs to be compiled.
Incremental build time takes longer if you change a file that is frequently imported, either directly or indirectly.
Investigation Of The Current Build Time
In practice, it is acceptable that Clean Build takes more time than Incremental Build. We will investigate both build times. But keep in mind that most of the time we are using the Incremental Build. This means the problems with Incremental Build time can kill our productivity.
Xcode Build Timeline
Luckily we have a Build Timeline panel in Xcode 14. After building your project, go to the “Report Navigator” in the left pane of Xcode. Then select the latest build report. After clicking the “Related Items” button, select the “Recent Build Timeline”. Please see the gif below to see visually how you can do this.
Here are the results I saw when I ran it on a complex project like AutoScout24.
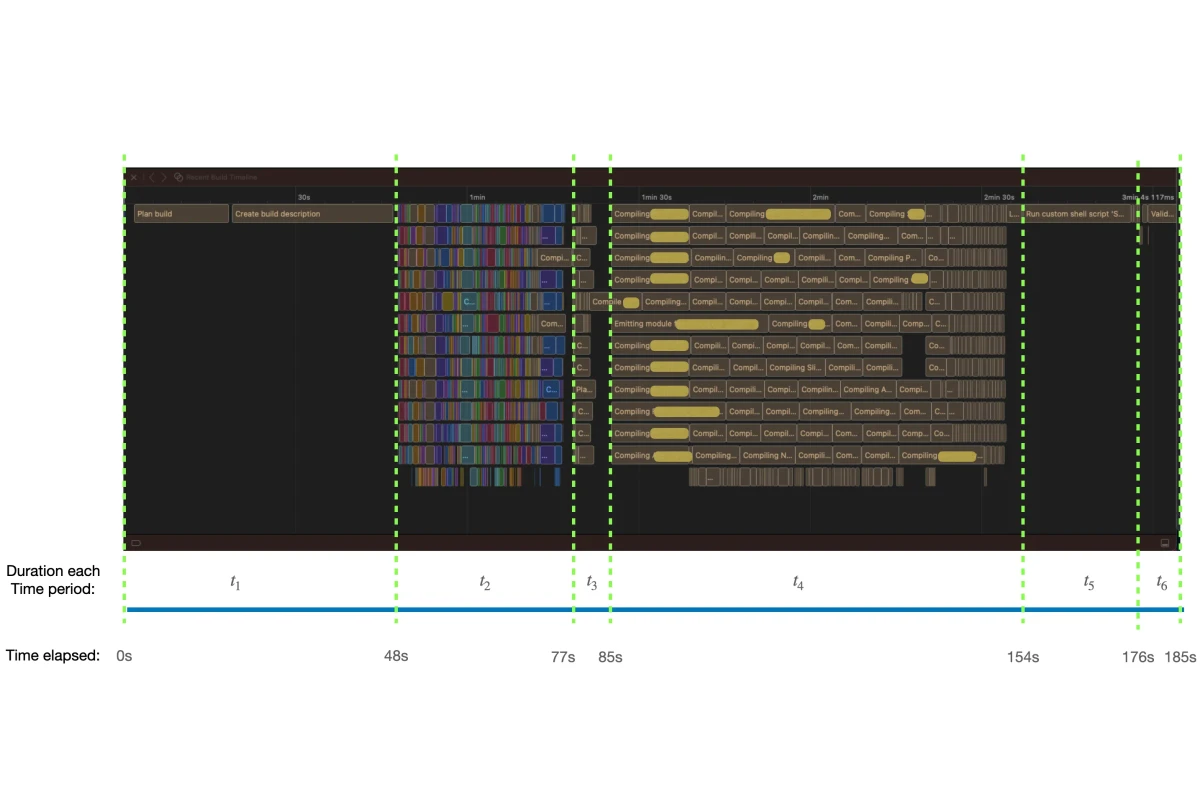
As you can see we spent a total of 185 sec on a clean build. It is not perfect but in high-scale projects, it is acceptable. Here are the time frames in the image above and what they mean.
- t1: Time for Xcode to analyze the overall project and create a building plan. (48s)
- t2: Time for Xcode to compile and integrate the frameworks we use. (39s)
- t3: Time for Xcode to compile resources (xib, storyboards, etc.) we have. (8s)
- t4: Time for Xcode to compile source codes we have and link everything. (69s)
- t5: Time for Xcode to run custom scripts like Swift Lint. (22s)
- t6: Time for Xcode to run remaining custom scripts and complete the validation. (9s)
You probably already realize that the timeframes we found on build time match the build steps we discussed in the previous section.
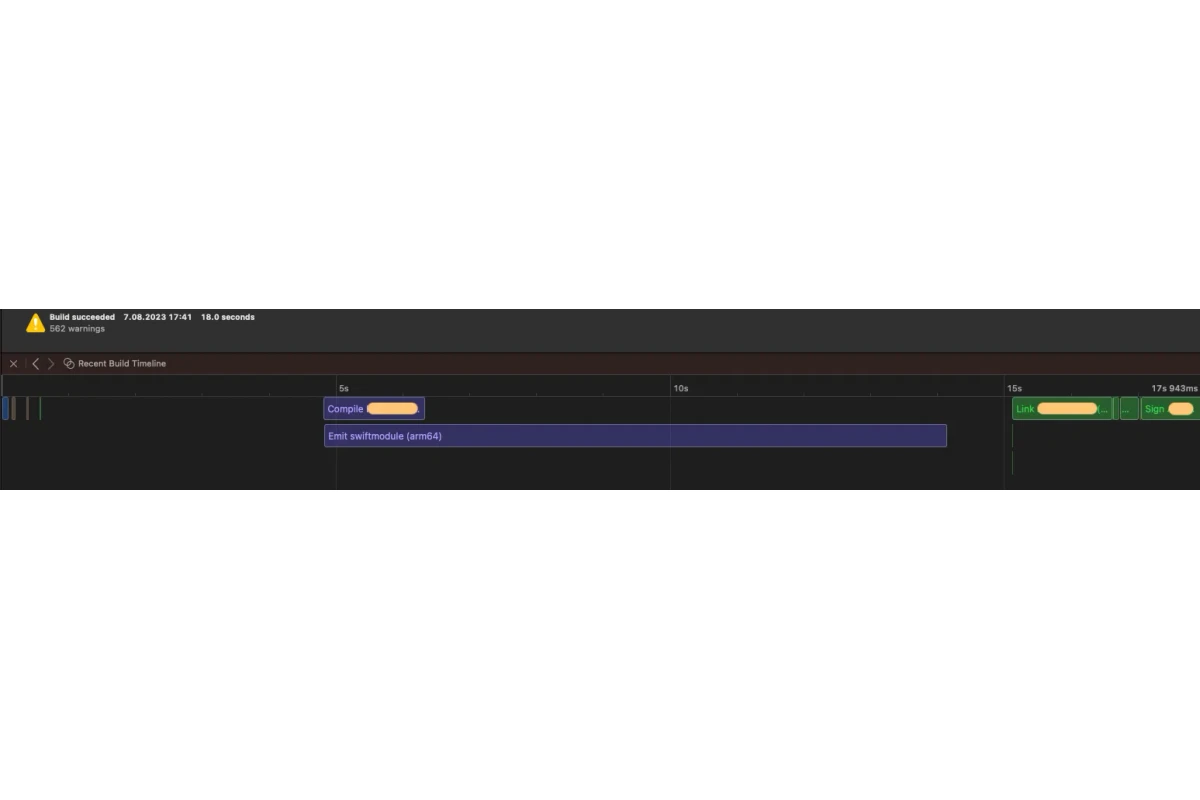
Okay, we see that it takes 185 seconds for a clean build for our project. Let’s see what happens if we just change a single line of code. We already point out that incremental build can take a longer time if you change a file that is imported a lot, directly or indirectly. For that reason, I updated a file that does not import any file. This means only this file should be compiled and linked. Let’s see the results.
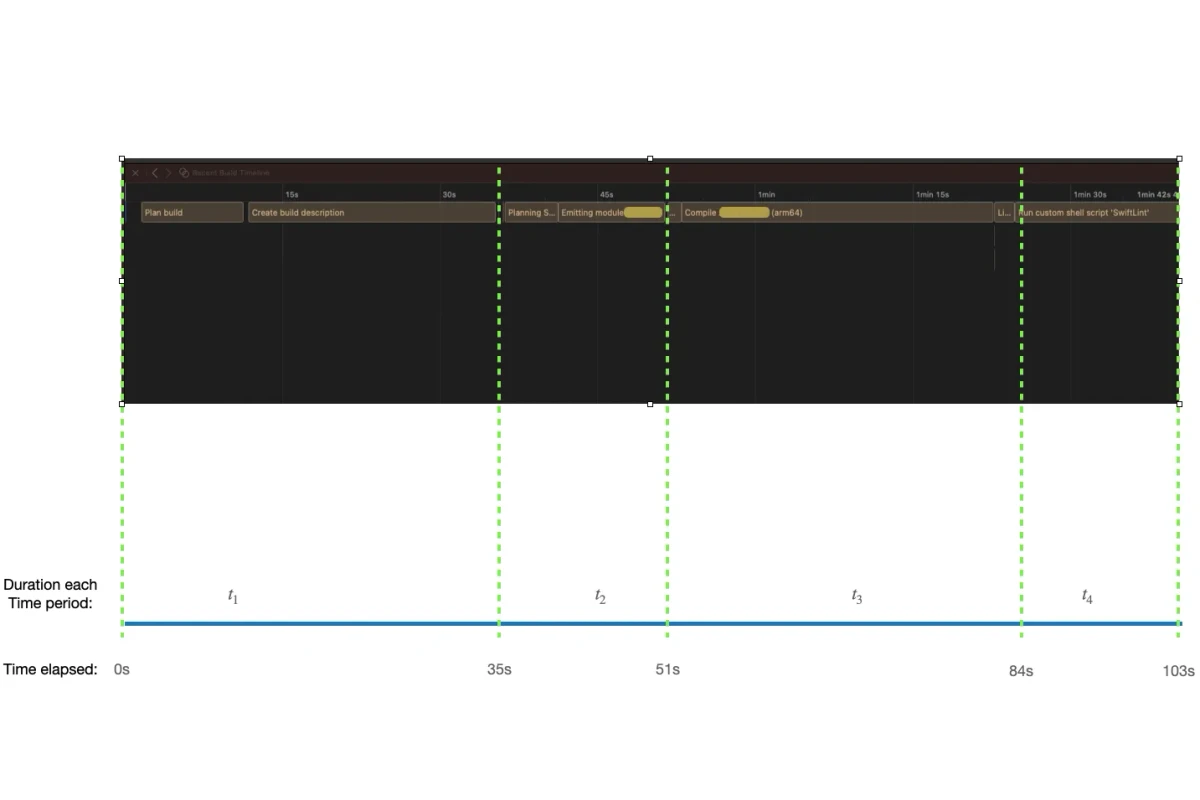
As you can see the results are nonsensical. I just added a single line of code in a file that is not imported to any file and it took 103 sec 🤯 Let’s investigate the timeframes again and try to understand the problem.
- t1: Time for Xcode to analyze the overall project and create a building plan. (35s) 😧
- t2: Time for Xcode to emit swift modules (Not sure what it means). (16s)
- t3: Time for Xcode to compile source codes, some unchanged and not imported lines due to bridging header. (33s) 🙄
- t4: Time for Xcode to run Swift Lint custom script. (19s)
Even if I changed some strings in a log in the same file it took more than 80 seconds!

It is obvious that what we see at t1, t3, and t4 is killing our productivity. Let’s try to understand what the problems are and how we can solve them.
Investigation of issues about t1 and t3
After digging into this problem on the internet I d that Apple released a new Xcode compiler component called Integrated Swift Driver with Xcode 14. According to WWDC 2022 — “Demystify parallelization in Xcode builds” session, Swift Driver is a replacement for the current driver that is a part of the Clang compiler. According to Apple the great benefit of the new Swift Driver is that it can run parallelized tasks that improve build time.
When you want to build an application or a framework, Xcode starts to build and link the dependent frameworks first. Assume that you have a project with 3 modules (source files or frameworks), Red, Orange, and Purple. Red depends on Orange and Purple. To be able to build the Red you first need to build and link other 2 frameworks, like in the image below. A, B, C, D, and E stand for internal tasks for each module (like compiling a single swift class).
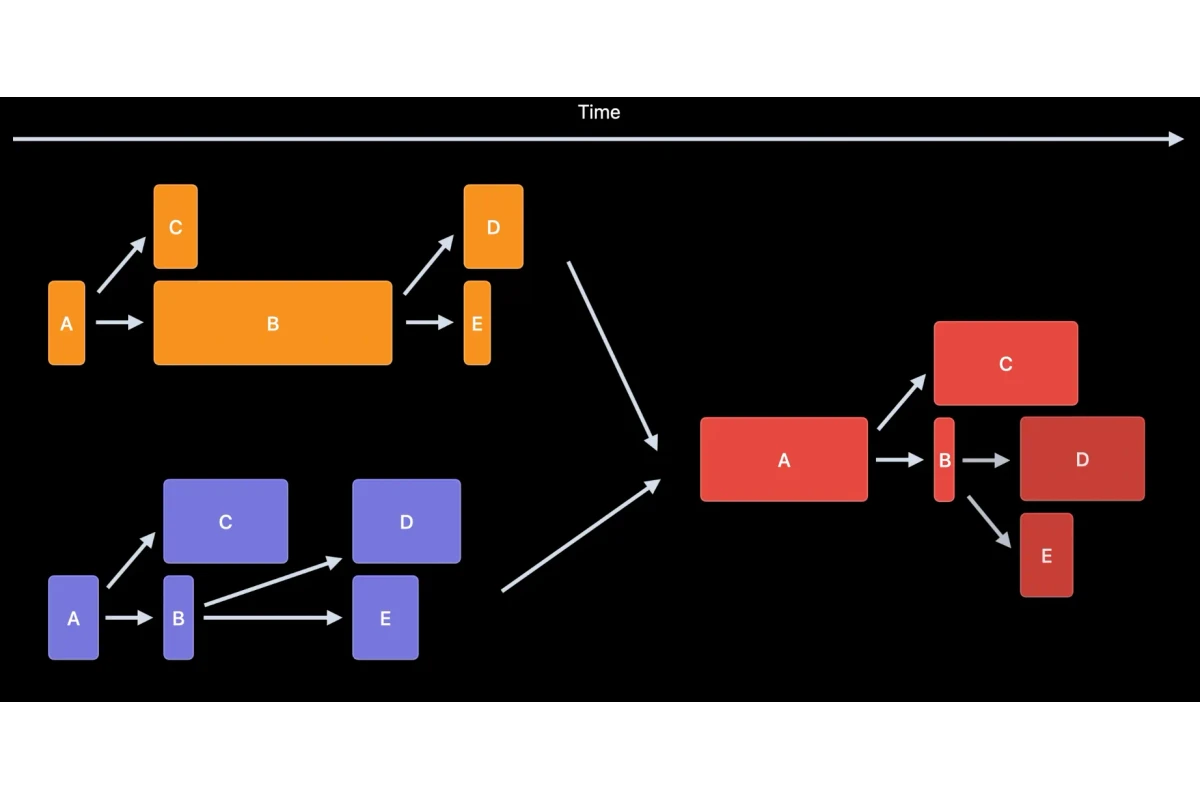
So until the Orange D and Purple D are completed, Xcode won’t start to build the Red module. This is the legacy approach we have until Xcode 14.
After the Xcode 14 with Swift Driver, Apple paralyzed these internal tasks (A, B, C, D, and E) to have faster builds. So it will change the image above like this:
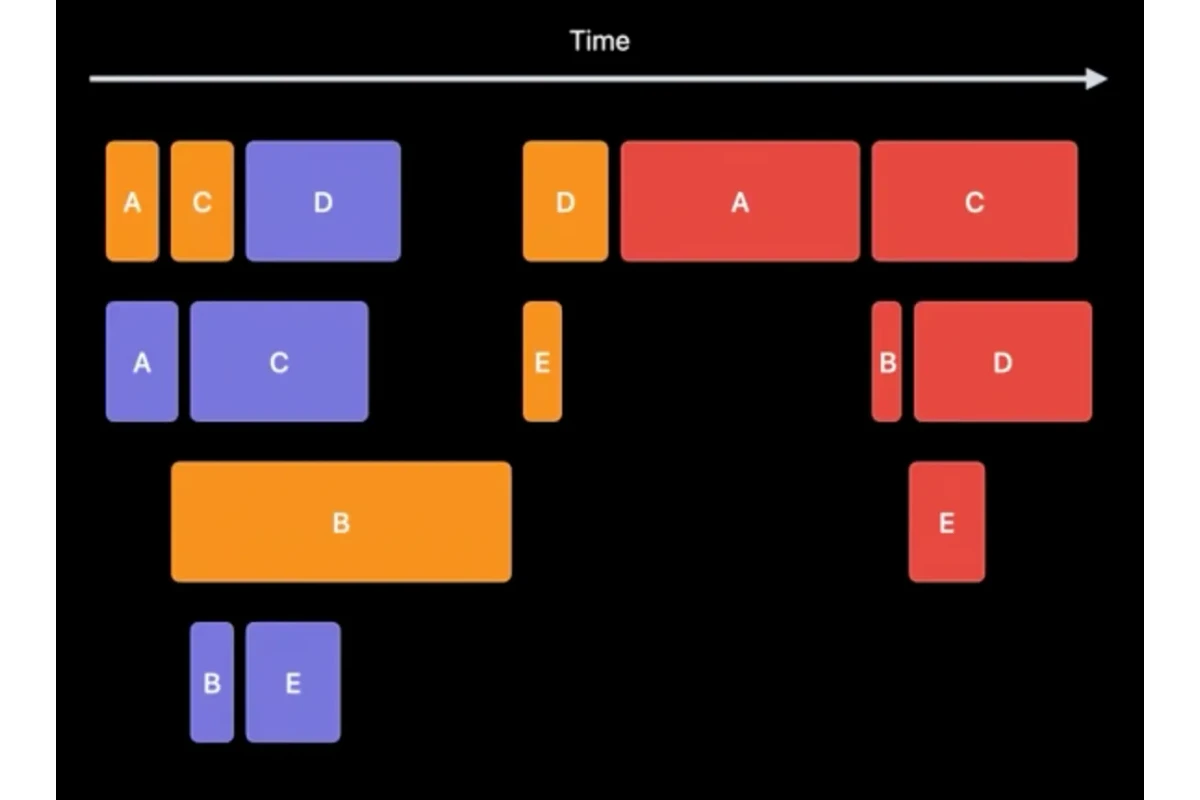
In theory, this will give us the opportunity to have faster builds. But unfortunately, it does the opposite thing for us. 🤦♂️
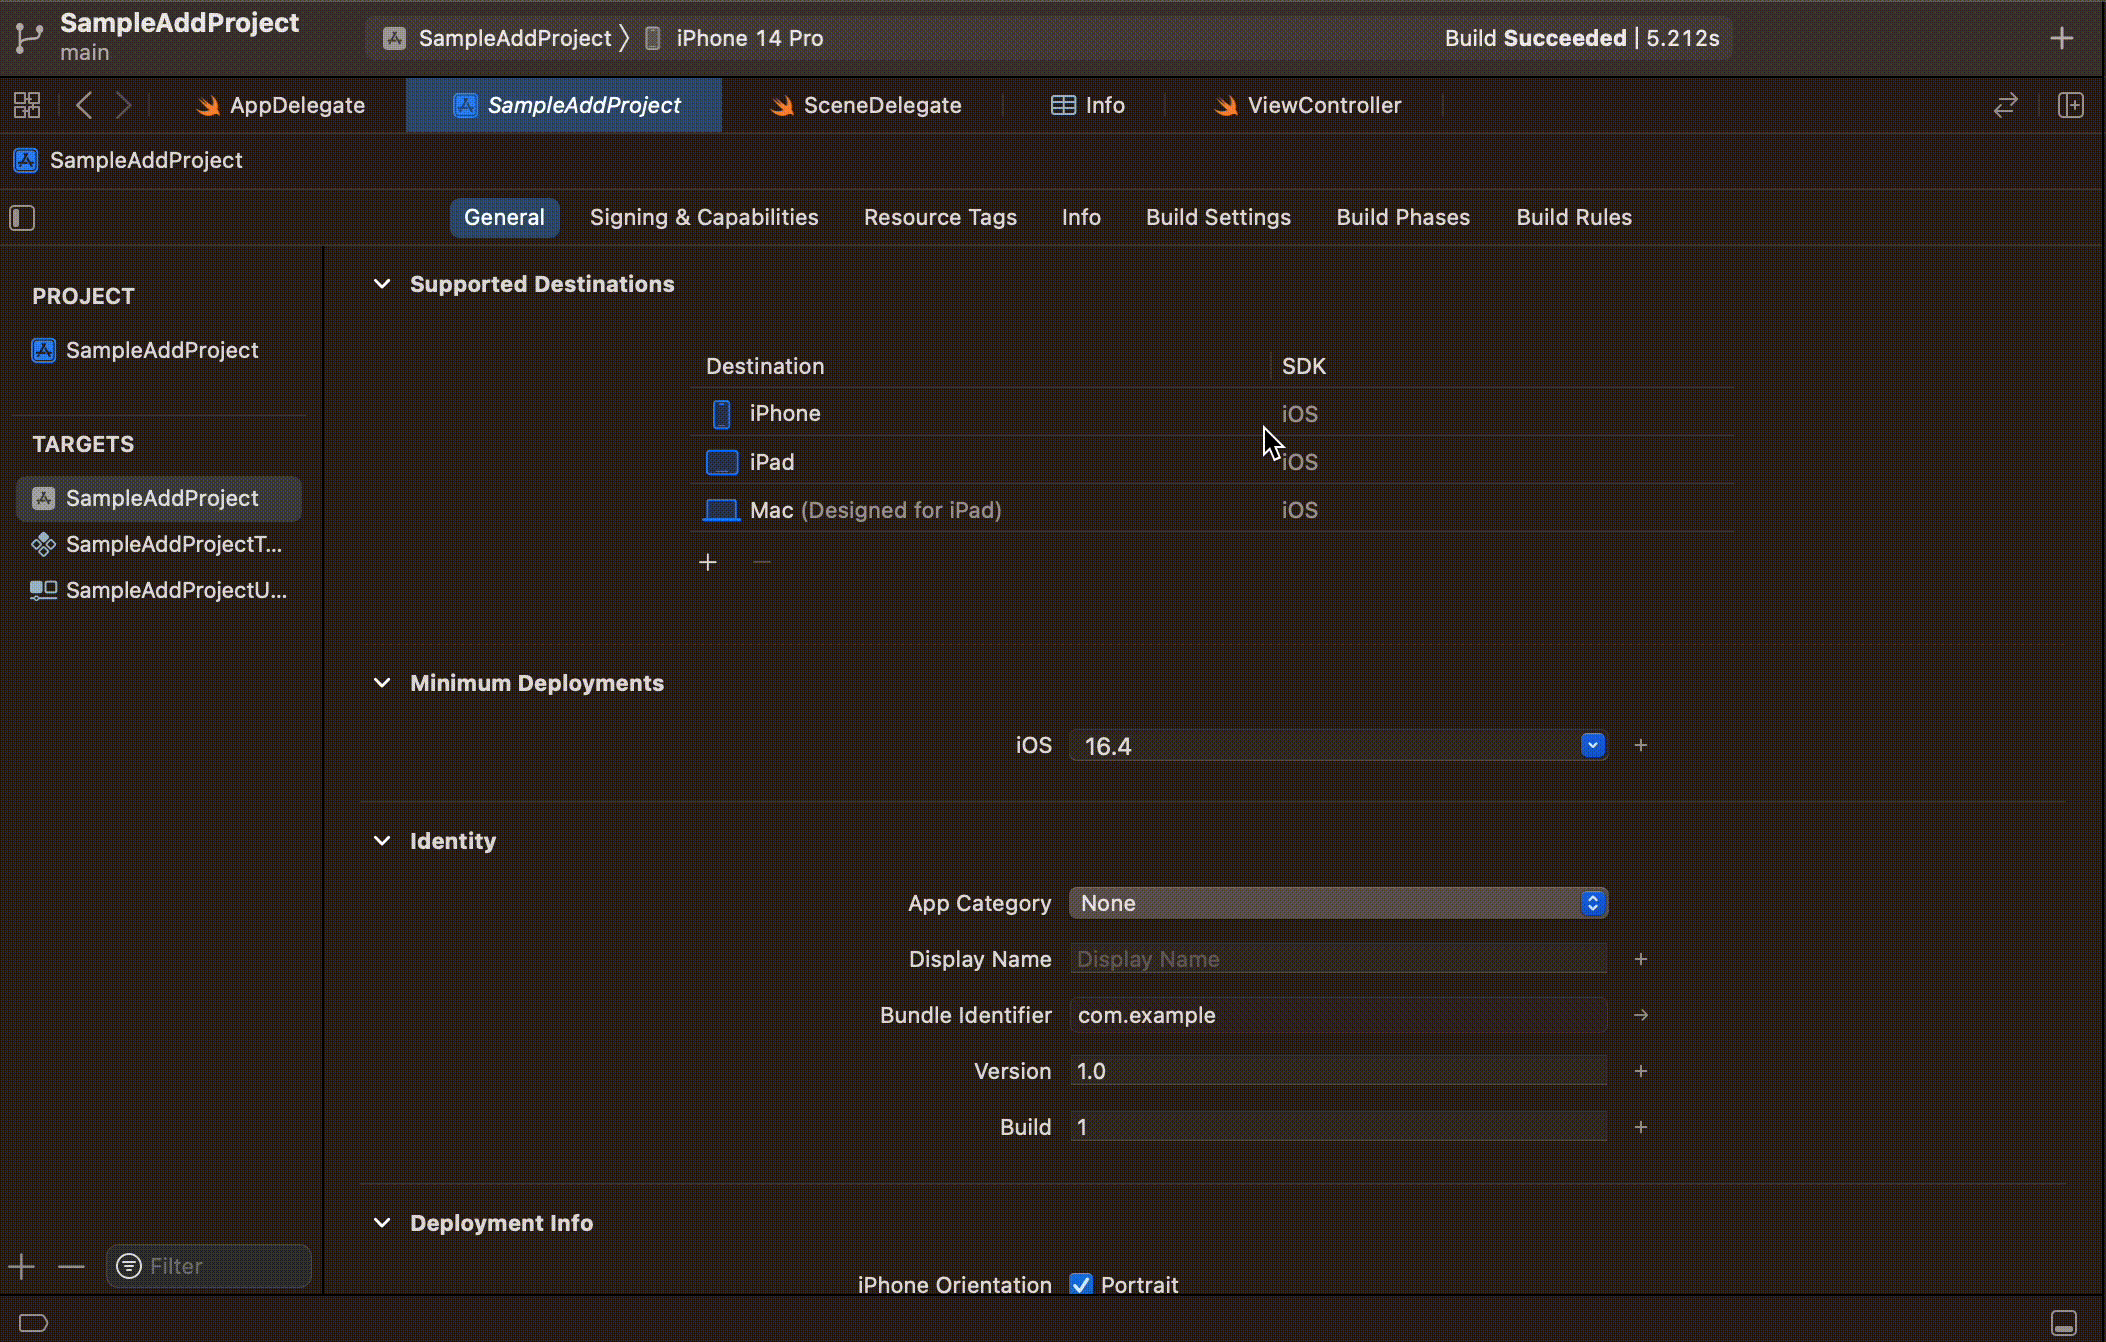
After a little research, I found out that people are complaining about the Xcode 14 incremental builds as we do in this swift forum thread. It turns out the new Swift Driver is wasting time on the build plan and trying to recompile some sources that are irrelevant to the changes. This is especially a problematic situation for projects which has Objective-C and Swift code in their projects. As a solution, people suggested disabling the new integrated Swift driver with a build setting called ‘SWIFT_USE_INTEGRATED_DRIVER’. We can add a User-Defined setting in Xcode and set ‘SWIFT_USE_INTEGRATED_DRIVER’ to ‘NO’.
Here are the results after disabling the new driver:
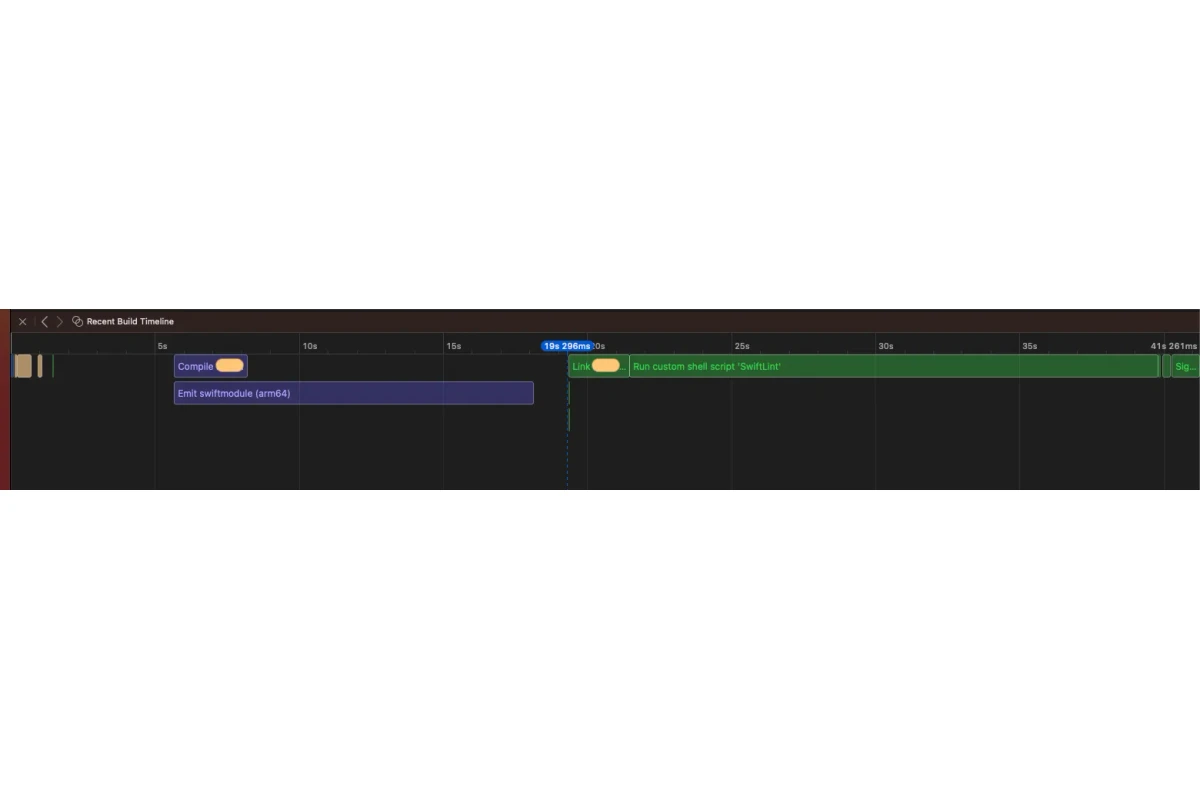
As you can see, comparing the previous image total time we spent for t1, t2, and t3 decreased from 84 sec to 19 sec 🤯 These results clearly show that the new Swift driver causes needless delays during builds. This is especially problematic when your project containing Swift and Objective-C codes.
**Important note:**You need to clean the DerivedData folder and quit the Xcode after disabling the ‘SWIFT_USE_INTEGRATED_DRIVER’ option. Otherwise, you may not see the effects after the upcoming builds.
Investigation of issues about t4 (SwiftLint)
Running a custom script like SwiftLint is a common thing you can see in most real-life projects. It is pretty handy to execute some custom stuff inside the build and there is a cost. For us running SwiftLint on every build costs us 19 sec. But this is not something we can easily get around, because SwiftLint is the tool we trust for the styling of the code.
The solution to such a problem can be to use commit hooks. We can run SwiftLint on the pre-commit hook, which means it runs SwiftLint before every commit. There are some articles and Gists you can find online for such purposes. But let me share the one that also has SwiftLint Fix functionality.
#!/bin/bash

# COLOR codes to use in logs
RED='\033[0;31m'
YELLOW='\033[1;33m'
GREEN='\033[0;32m'
BOLD='\033[1m'
NC='\033[0m' # No Color

# LOG tag of file
LOG_TAG="PRE_COMMIT_HOOK_LOG :: "
# swiftlint.yml path.
LINT_CONFIG_FILE=".swiftlint.yml"

set -e

# check if lint exists.
if ! command -v swiftlint &> /dev/null
then
    echo -e "${LOG_TAG}${RED}SwiftLint could not be found. Please install it in your computer.${NC}"
    exit 1
fi

echo -e "${LOG_TAG}Linting..."

#Always lint one file to prevent "No lintable files found at paths: ''"
export SCRIPT_INPUT_FILE_0="##Put one of your files with its path that will always be in your project. (For Ex: AppDelegate)"
# This variable will store the files that needs to be re-added after auto fix.
FILES_TO_ADD=""
swiftFileCount=1

# We will count the changed files and apply lint only for them.
while IFS= read -r file_path; do
    export SCRIPT_INPUT_FILE_$swiftFileCount="$file_path"
    swiftFileCount=$((swiftFileCount + 1))
    # We should escape from whitespace paths.
    escaped_path="${file_path// /\\ }"
    FILES_TO_ADD+="'$escaped_path' "
done < <(git diff --diff-filter=d --name-only --cached | grep ".swift$")

echo -e "${LOG_TAG}The count of Swift files you changed and add to git is '${BOLD}$swiftFileCount${NC}'"

# In case there is no change besides the default 'Classes/Constants.swift' don't run the lint
if [ "$swiftFileCount" -ne 1 ]; then
    export SCRIPT_INPUT_FILE_COUNT=$swiftFileCount

    if swiftlint --fix --strict --use-script-input-files --config $LINT_CONFIG_FILE && swiftlint --use-script-input-files --config $LINT_CONFIG_FILE --force-exclude --strict; then
        # Re-add files after lint fix. Otherwise we can't send the auto fixed codes to the remote.
        # adding with echo prevents incorrect file addings.
        echo "git add ${FILES_TO_ADD}"
        echo -e "${GREEN}${LOG_TAG}No Swift Lint violations found. Your commit is good to go.${NC}"
        exit 0
    else
        echo -e "${RED}${LOG_TAG}'${BOLD}swiftlint fix${NC}' ${RED}could not fix the problem. Please check the link failures in your code!!!${NC}"
        exit 1
    fi
else
    echo -e "${LOG_TAG}${YELLOW}No files to lint!${NC}"
    exit 0
fi

# Unset the environment variables
unset "SCRIPT_INPUT_FILE_COUNT"
for ((i=0; i<swiftFileCount; i++)); do
    unset "SCRIPT_INPUT_FILE_$i"
done
You can add this file to your ‘.git/hooks’ directory and use it.
Let’s see the results without having SwiftLint in the custom script phase.
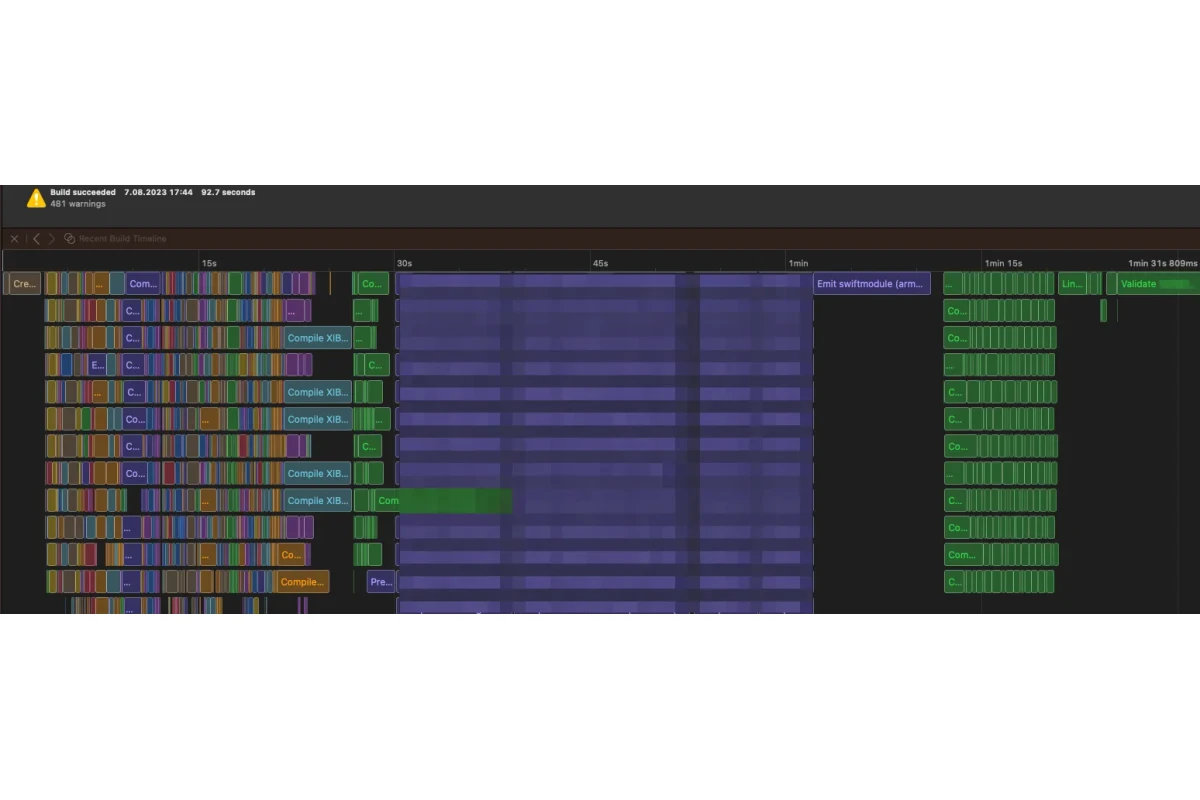
As you can see the total time we spent to build decreased to 18 sec (it was between 73–103 sec). Also, as you can see in the image below Clean Build time also decreased to 91 sec (it was 185 sec).
From the test results we saw here, we can say that disabling the integrated swift driver and putting swift lint to commit hooks decreases the build time from 103 sec to 18 sec. This means we use %80 less time to build the project. Also, a clean build takes 50% less time.
Summary
In this article, my aim was to show you how to investigate build-time problems in Xcode and how to solve some of them. Keep in mind that build-time-related issues can have a variety of causes and that you might be suffering from a different problem than we discussed here. But if you follow this methodology, I believe that you can solve your problems one by one.
During this process, I applied some of the improvements that Apple suggested for improving build speed. But for me, it didn’t make that much difference. Nonetheless, here are the links in case you are curious: