iOS UI Testing with Deep Links
Emin Deniz · January 15, 2024 · 17 min read
iOS UI Testing with Deep Links
In our daily lives, most of us share links to someone a couple of times in a single day. This user-friendly and basic approach saves hundreds of hours for all of us. We can share the things we like with our friends with a single long line of text and they can see what we want to see in their browsers. Even though this is a useful approach, as software developers, we try to improve this experience by launching the related application to show the link content. If my friend sends me a cloth link from the Amazon platform, I’d prefer to see it via the Amazon application. If my friend sends me a Slack message link, I’d prefer to see the message within the Slack application. If someone sends me an Instagram profile link, I’d want to see it using the Instagram application. Many users prefer to see the content of the link within the relevant application. This is because the application has more context and offers better UX than the browser, especially on mobile.
Users prefer to see the content of the link, in the related application.
This concept is famously known as Deep Link in the mobile development community. You can find tons of articles on the internet about ‘how you can set up deep links’ and ‘what are the different types of deep links’ for both iOS and Android platforms. But ‘How to automatically test the deep links?’ is a different and not well-known topic that we will discuss in this article.
Deep Link Types
Let’s understand the concepts before diving into testing. There are 2 types of deep link types in iOS, URL Schemes and Universal Links. In summary, Universal Links are the newer approach and offer a better experience for the user. However, let’s quickly examine their differences; it will be important for us in the following sections.
URL Schemes
URL Schemes are easy-to-implement deep link solutions that don’t need any additional dependency. You can follow the steps below and create a sample project to check it yourself.
- Create a new Xcode project called SampleDeepLink with
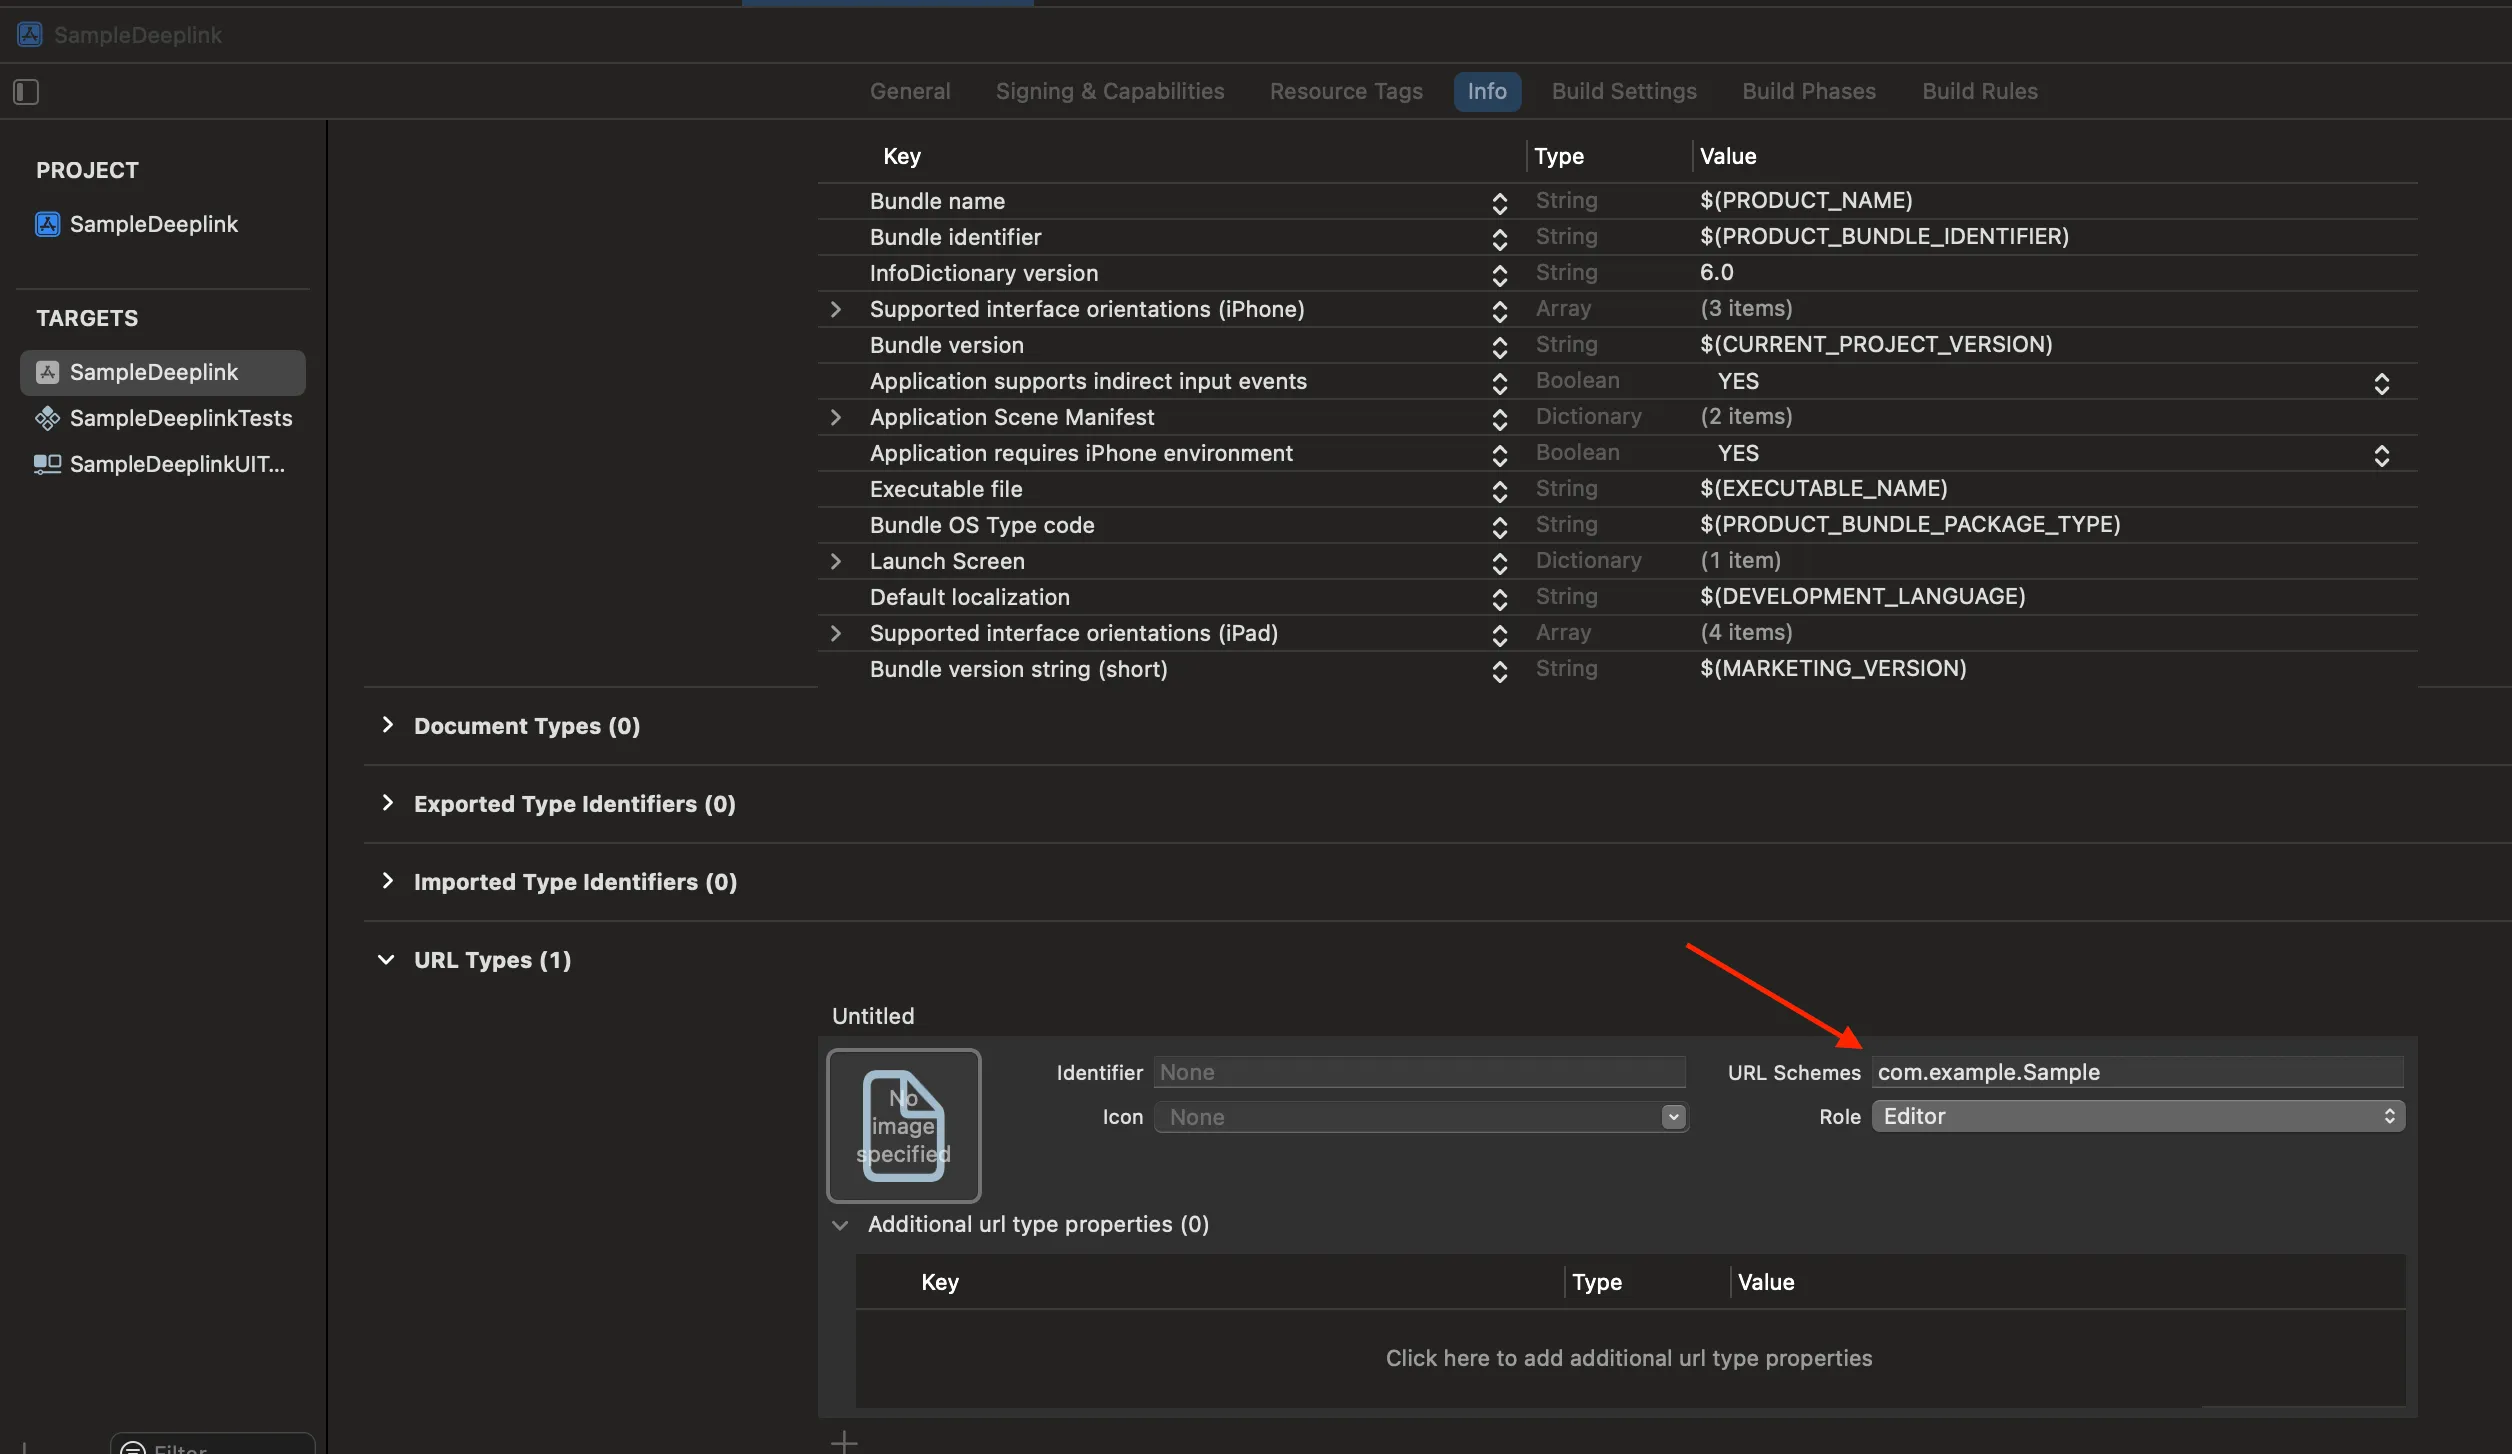
com.example.SampleDeepLinkbundle id. (Xcode 15) - Go to Project Settings > Info tab and click the plus (+) icon to create a new URL Types.
- Type
com.example.Samplein URL Schemes field.
And that’s it! Your URL Scheme is ready to use. After these 3 steps you should have a similar view in your Xcode.

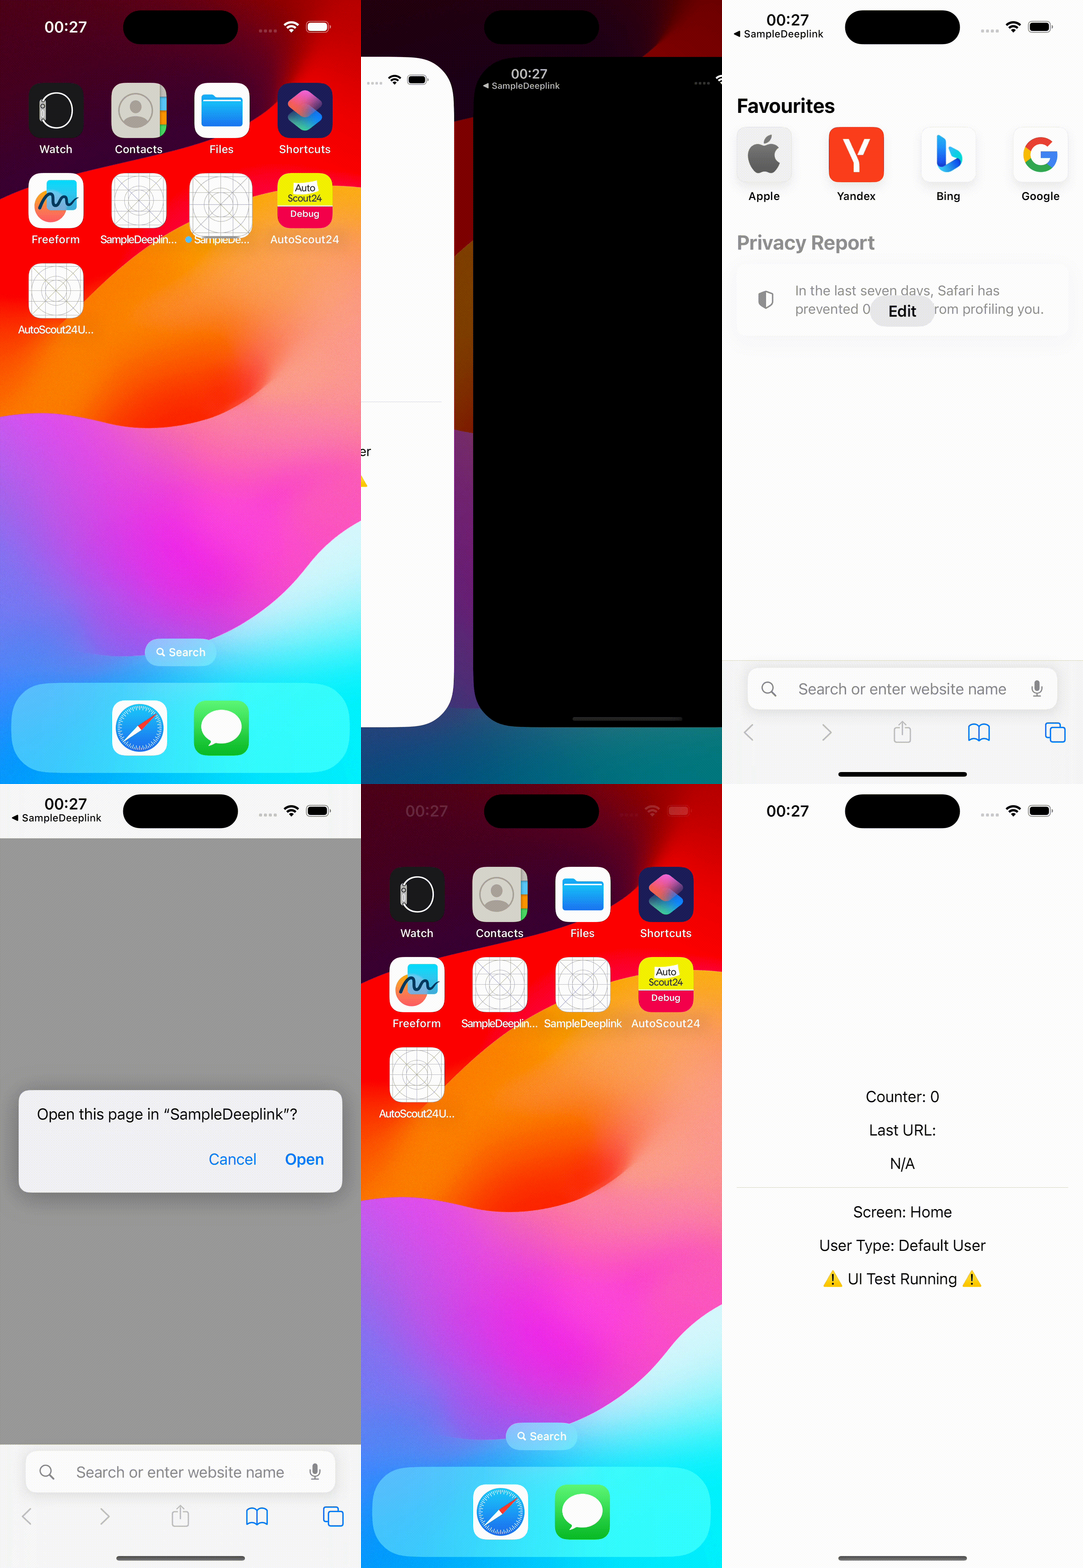
After first installing your app to your simulator you can kill it. You can launch your simulator safari and type a URL that starts with “com.example.sampe://” to see the magic. While functional, testing deep links with Safari can be a bit challenging during development. For an easier solution open your Mac terminal and type the following command.
xcrun simctl openurl booted "com.example.sample://"
This will automatically launch the sample app like a charm. After this point you can use any URL Scheme starts with “com.example.sampe://” path. With each path, you do different functions. Here are some common examples;
com.example.sample://listcan redirect users to the list screen.com.example.sample://detailcan redirect users to the detail screen.com.example.sample://detail?id=12345can redirect users to the detail screen with a product with 12345 id.
You can generate an infinite number of functionalities depending on use cases.
Be aware that we aren’t using the bundle ID of the application com.example.SampleDeppLink to launch the app. We are using com.example.sample pattern because it is defined in URLScheme. You can use the same reverse domain notation (DNS) for both the bundle ID and URL Schemes. In this article, I intentionally use different notations to get your attention.
If the user doesn’t have your application, URL Schemes won’t work. For that problem, we have a slightly better option.
Universal Links
Universal Links entail a somewhat more complex implementation, but they offer a superior user experience. The setup for Universal Links involves three essential steps.
- You need to have a website that supports HTTPS and you have to have a CA Verified certificate.
- You need to create a JSON file called apple-app-site-association and put it in a path on your website.
- You need to define associated domains by Xcode in your app.
Also, what if I told you this JSON will be public to anyone? If you don’t believe let’s check Medium’s public JSON file. Here is the link;
https://medium.com/apple-app-site-association
Here is the pretty format that you will see in that link. I just trimmed it for readability.
{
  "applinks": {
    "apps": [

    ],
    "details": {
      "2XNJA5XN6D.com.medium.reader": {
        "paths": [
          "NOT /m/callback/*",
          "NOT /m/connect/*",
          "NOT /m/account/*",
          "NOT /m/oauth/*",
          "NOT /m/global-identity"
          "*"
        ]
      },
      "B5WFE29T5P.com.medium.hangtag.internal": {
        "paths": [
          "NOT /m/callback/*",
          "NOT /m/connect/*",
          "NOT /m/account/*",
          "NOT /m/oauth/*",
          "NOT /m/global-identity",
          "*"
        ]
      },
      "2XNJA5XN6D.com.medium.internal": {
        "paths": [
          "NOT /m/callback/*",
          "NOT /m/connect/*",
          "NOT /m/account/*",
          "NOT /m/oauth/*",
          "NOT /m/global-identity"
          "*"
        ]
      },
      "2XNJA5XN6D.com.medium.staging": {
        "paths": [
          "NOT /m/callback/*",
          "NOT /m/connect/*",
          "NOT /m/account/*",
          "NOT /m/oauth/*",
          "NOT /m/global-identity"
          "*"
        ]
      },
      "2XNJA5XN6D.com.medium.reader.development": {
        "paths": [
          "NOT /m/callback/*",
          "NOT /m/connect/*",
          "NOT /m/account/*",
          "NOT /m/oauth/*",
          "NOT /m/global-identity"
          "*"
        ]
      }
    }
  }
}
This is the public Apple App Site Association JSON file that is generated by Medium developers. This is enough for iOS to understand if it receives a URL starting with https://medium.com, it should launch one of those 5 bundle ids.
You probably have noticed that 1 bundle ID is designated only for production, while the rest are intended for development purposes.
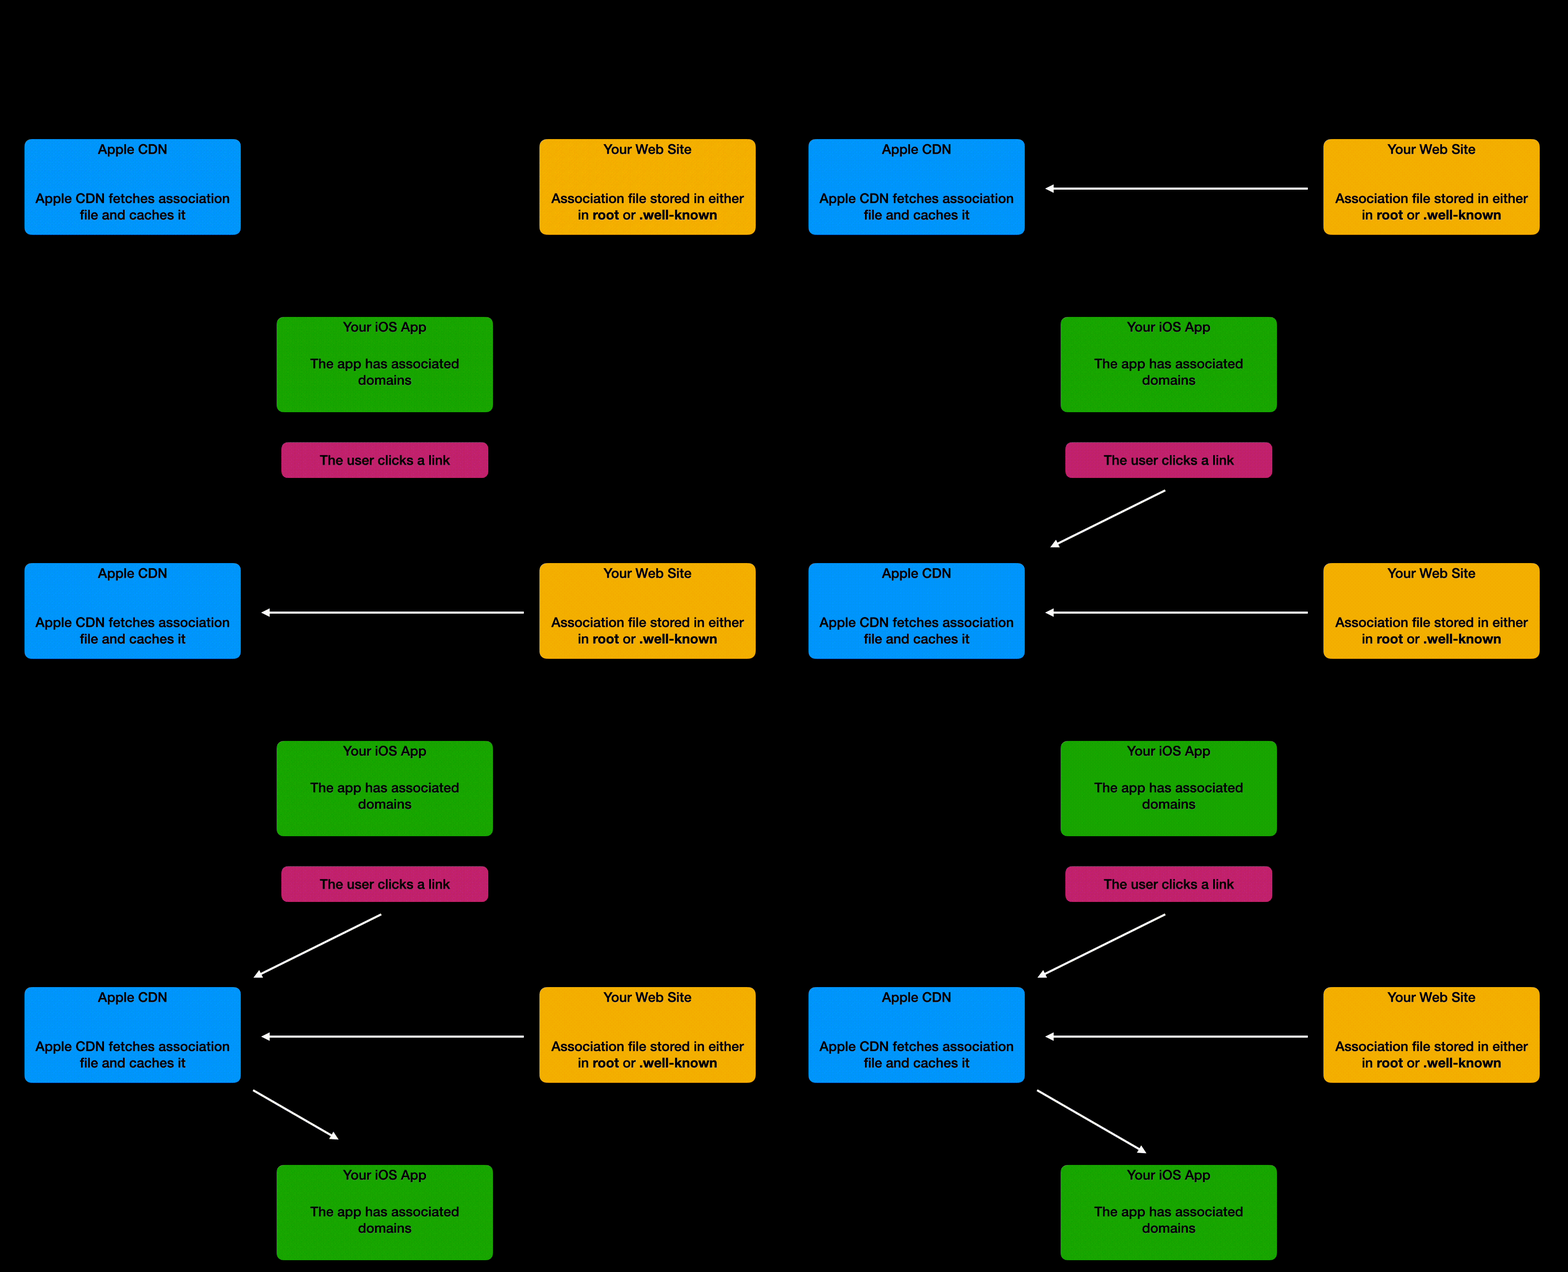
There are lots of detailed explanations of how this works on the internet. But the short story is Apple caches a website Apple App Site Association file. It checks the ‘root’ directory and ‘well-known’ directory of the web page. If it exists, iOS will launch the related application if installed. If it is not installed it will launch the website in your mobile browser.

Keep in mind that Universal links only work if the user clicks a link related to your domain. In case the user types each character of your website in the browser, the universal link won’t work. This is an important point for us in the test section.
You can find detailed information about how you can set up Universal Link on Apple Documents and some easy-to-understand tutorials such as this one.
UI Testing Deep Links
Finally, let’s dive into the core focus of this article: automating the testing of Deep Links. All the logic we have in our projects needs to have automatically run tests. This can be unit tests, UI tests, or some kind of automated test solution such as Appium. In this article, we will use UI tests to secure our deep link logic.
All the logic we have in our projects needs tests.
Like the implementation differences, we need to have test strategy differences between URL Schemes and Universal Links. Because URL schemes can be opened by typing characters to Safari but Universal Links can’t. Unfortunately, we don’t have rich text applications such as the Notes app in simulators. Additionally, we can’t use real devices because on CI/CD, we can’t always connect a real device. Therefore, we’ve had to rely on some of the pre-installed simulator applications in this scenario. Pre-installed simulator apps with link capabilities are:
- Safari
- Messages
- Contacts
- Reminders
- Spotlight
Safari is an easy-to-launch option for UI tests but it can’t be used for Universal Link tests. Contacts and Reminders can be used for manual testing purposes (you can save some links and reuse them later), but navigating it by UI test can be challenging. Messages app is a good alternative that can support both Universal Links and URL Schemes. But the send messages can’t be seen in the iOS 17 simulator due to a bug (One of many bugs🤦♂️). Spotlight can open Universal Links like the user clicks links but it can’t load URL Schemes because it tries to search on Google.
On top of that, an API is provided by Apple with Xcode 14.3, which is XCUIApplication.open(_:). In theory, this API should open the app with a provided URL. It can launch the app but the app can’t receive the URL provided in the API. This API still not working on Xcode 15.1 with iOS 17.1 (reference post reported by me).

In this ugly situation, our solution is to use Safari for URL Schemes and Spotlight for the Universal links.
Please comment if any of you know a better alternative.
Simple Logic For Test Purposes
We already created a project called SampleDeppLink previously. Now we can add a few UI elements and simple logic for UI tests. We will have;
- Counter label to see how many deep links we received
- Last URL label to see the latest URL we received.
- Screen label to show which screen we should be redirected to.
- User label to show what type of user values we should show (Default, paid, premium, etc.).
Here is the SwiftUI code for this UI;
import SwiftUI

struct ContentView: View {
    @State private var counter = 0
    @State private var lastUrl = "N/A"
    @State private var screenName = "Home"
    @State private var userType = "Default User"

    var body: some View {
        VStack (spacing: 16, content: {
            Text("Counter: \(counter)")
                .accessibilityIdentifier(AccessibilityIdentifiers.ContentView.counter.rawValue)
            Text("Last URL:")
            Text(lastUrl)
                .accessibilityIdentifier(AccessibilityIdentifiers.ContentView.lastUrl.rawValue)
            Divider()

            Text("Screen: \(screenName)")
                .accessibilityIdentifier(AccessibilityIdentifiers.ContentView.screenName.rawValue)
            Text("User Type: \(userType)")
                .accessibilityIdentifier(AccessibilityIdentifiers.ContentView.userType.rawValue)
        })
        .padding()
        // 1. Receive URL
        .onOpenURL(perform: { url in
            parseUrl(url: url)
        })
    }
}

extension ContentView {
    func parseUrl(url: URL){
        counter += 1
        lastUrl = url.absoluteString

        //2. Break url in to pieces and send it to setRouting
        // Example URL =             com.example.sample://list?premium
        let scheme = url.scheme     // com.example.sample
        let host = url.host         // list
        let querry = url.query      // premium
        setRouting(host: host, querry: query)

    }

    private func setRouting(host: String?, query: String?){
        // 3. Set the screen name by checking the host
        switch host {
        case "list":
            screenName = "List Screen"
        case "detail":
            screenName = "Detail Screen"
        default :
            screenName = "Home Screen"
        }

        // 4. Set user type by checking query
        guard let querry = querry else {
            userType = "Default User"
            return
        }

        switch query {
        case "paid":
            userType = "Paid User 💰"
        case "premium":
            userType = "Premium User 🤑"
        default :
            userType = "Default User"
        }

    }
}
The logic is straightforward but I will explain anyway.
- We receive the URL by using onOpenURL API and parse it on parseURL function.
- Breaking the URL into pieces and sending it to setRouting function.
- Setting screen name by checking the host parameter.
- Setting the user type by checking the query parameter.
You might realize we have enum values for accessibility identifiers. This is a good approach to unifying identifier strings. Here is the AccessibilityIdentifiers enum. We need to add the UITest target membership to this file.
enum AccessibilityIdentifiers {

    enum ContentView : String {
        case counter = "ContentView_counter"
        case lastUrl = "ContentView_lastUrl"
        case screenName = "ContentView_screenName"
        case userType = "ContentView_userType"
    }
}
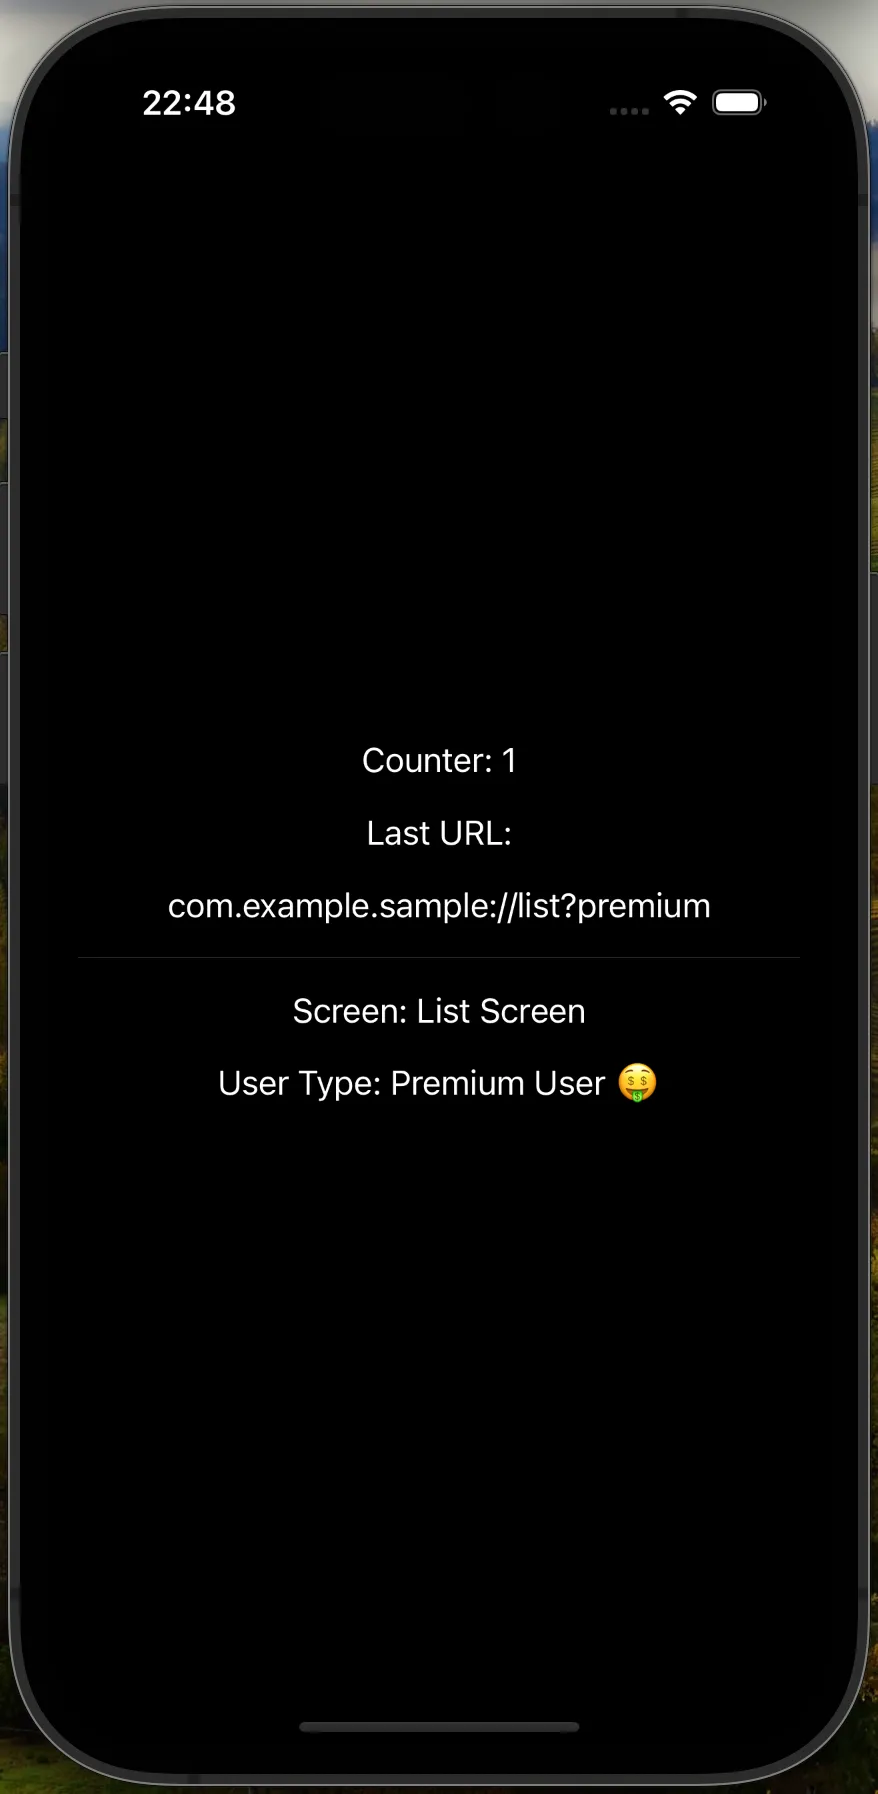
Here is our basic UI.

Now we can start testing 🎉
UI Testing URL Schemes
We need to use Safari for URL Schemes. We can start by adding a helper class that can launch Safari and type the URL schemes. Here is our UITestHelpers.swift class.
import XCTest

final class UITestHelpers {

    // Singleton instance
    static let shared = UITestHelpers()
    private init() {}

    // Safari app by its identifier
    private let safari: XCUIApplication = XCUIApplication(bundleIdentifier: "com.apple.mobilesafari")

    /// Opens safari with given url
    /// - Parameter url: URL of the deeplink.
    func openWithSafari(app: XCUIApplication, url: String) {
        if safari.state != .notRunning {
            // Safari can get in to bugs depending on too many tests.
            // Better to kill at at the beginning.
            safari.terminate()
            _ = safari.wait(for: .notRunning, timeout: 5)
        }

        safari.launch()

        // Ensure that safari is running
        _ = safari.wait(for: .runningForeground, timeout: 30)

        // Access the search bar of the safari
        // Note: 'Address' needs to be localized if the simulator language is not english
        let searchBar = safari.descendants(matching: .any).matching(identifier: "Address").firstMatch
        searchBar.tap()

        // Enter the URL
        safari.typeText(url)

        // Simulate "Return" key tap
        safari.typeText("\n")

        // Tap "Open" on confirmation dialog
        // Note: 'Open' needs to be localized if the simulator language is not english
        safari.buttons["Open"].tap()

        // Wait for the app to start
        _ = app.wait(for: .runningForeground, timeout: 5)
    }

    func waitFor(element: XCUIElement,
                 failIfNotExist: Bool = true,
                         timeOut: TimeInterval = 15.0) {
        if !element.waitForExistence(timeout: timeOut) {
            if failIfNotExist {
                XCTFail("Could not find \(element.description) within \(timeOut) seconds")
            }
        }
    }
}
The comments clearly explain what openWithSafari function does. The waitFor function is a general helper we can use to check if an element is visible at a given time. Let’s implement the actual tests for URLSchemes.
import XCTest
import UIKit

final class URLSchemesUITests: XCTestCase {

    // 1. App instance
    private var app = XCUIApplication()

    override func setUpWithError() throws {
        // 2. App setup and launch
        app.launchArguments = ["UITEST"]
        app.launch()
    }

    override func tearDownWithError() throws {
        // 3. App termination on tear down
        app.terminate()
    }

    // 4. Tests
    func test_givenListURLProvidedWithoutQuerry_whenAppLaunched_thenExpectedToSeeListScreenWithDefaultUserLabel() throws {
        let url = "com.example.sample://list"
        // 5. Calling assert with requeired test variables
        assertScreenViews(url: url,
                          screenNameText: "Screen: List Screen",
                          userTypeText: "User Type: Default User")
    }

    func test_givenListURLProvidedWithPremium_whenAppLaunched_thenExpectedToSeeListScreenWithPremiumUserLabel() throws {

        let url = "com.example.sample://list?premium"
        assertScreenViews(url: url,
                          screenNameText: "Screen: List Screen",
                          userTypeText: "User Type: Premium User 🤑")
    }

    func test_givenDetailURLProvidedWithPaid_whenAppLaunched_thenExpectedToSeeDetailScreenWithPaidUserLabel() throws {

        let url = "com.example.sample://detail?paid"
        assertScreenViews(url: url,
                          screenNameText: "Screen: Detail Screen",
                          userTypeText: "User Type: Paid User 💰")
    }


    func test_givenURLProvidedWithDefaults_whenAppLaunched_thenExpectedToSeeHomeScreenWithDefaultUserLabel() throws {

        let url = "com.example.sample://"
        assertScreenViews(url: url,
                          screenNameText: "Screen: Home Screen",
                          userTypeText: "User Type: Default User")
    }

}


extension URLSchemesUITests {
    private func assertScreenViews(url:String,
                                   screenNameText:String,
                                   userTypeText:String) {

        // 6. Launching Safari with given URL
        UITestHelpers.shared.openWithSafari(app: app, url: url)

        // 7. Wait for one of the UI elements visible
        let counterLabel = app.staticTexts[AccessibilityIdentifiers.ContentView.counter.rawValue]
        UITestHelpers.shared.waitFor(element: counterLabel)

        // 8. Assert expected values to actual ones.
        let lastURLLabel = app.staticTexts[AccessibilityIdentifiers.ContentView.lastUrl.rawValue]
        let screenName = app.staticTexts[AccessibilityIdentifiers.ContentView.screenName.rawValue]
        let userType = app.staticTexts[AccessibilityIdentifiers.ContentView.userType.rawValue]

        XCTAssertEqual(lastURLLabel.label, url)
        XCTAssertEqual(screenName.label, screenNameText)
        XCTAssertEqual(userType.label, userTypeText)
    }
}
Let’s go over each important step in this test class.
- We are creating an
appinstance to run UI Tests for this application. - Before launching the application we are passing
UITestflag to launch arguments and launch the app. Using that capability we can introduce UI test-related logic in the actual application. Keep in mind that this step is not mandatory. Even if we don’t useapp.launch()function safari will launch our app via the URL scheme. But I recommend this approach personally, because you may need to enable/disable some logic for UI Tests. - Terminate the app on each test end to have a clean test cycle for the next iteration.
- Implementing actual test cases. Although it is not mandatory, the Given-When-Then format is applied in those tests for easy readability.
- Calling private
assertScreenViewsfunction with test-related parameters for each test. - Launch the Safari with the given URL with the help of the helper function we implemented previously.
- Wait for any of the UI elements becoming visible. It might take a while for Safari to launch our app. We should wait for an element visibility.
- Assert the actual UI element values with expected values. If any of them do not match test will fail.
We have just verified;
- 4 different URLs appeared correctly on the UI.
- 3 different screen values (home, list, detail) were parsed and directed correctly.
- 3 different user values (default, paid, premium) were parsed and labeled correctly.
So far, this is sufficient for me to ensure that our logic is working fine. We can always add more tests if needed. Here are the results from the simulator.

Satisfying, right?
UI Testing Universal Links
Universal links setup is a bit tricky as we mentioned earlier. You need to have a website that supports HTTPS and you should have CA verified certificate. Although it is not too complicated to set this up, it requires much effort and possibly some investment (for a CA Verified certificate). In the scope of this article, i let’s assume we’ve already set up the Universal Link configuration.
As we discussed earlier, universal links can only be launched by clicking on a link. That’s why we need an app on the simulator that can easily generate URLs. When I was writing this article, the best alternative available was the Spotlight app.
Let’s update the UITestHelpers.swift to have Spotlight capability.
import XCTest

final class UITestHelpers {

    static let shared = UITestHelpers()
    private init() {}

    private let safari: XCUIApplication = XCUIApplication(bundleIdentifier: "com.apple.mobilesafari")
    private let spotlight = XCUIApplication(bundleIdentifier: "com.apple.Spotlight")

    /// Opens safari with given url
    /// - Parameter url: URL of the deeplink.
    func openWithSafari(app: XCUIApplication, url: String) {
        if safari.state != .notRunning {
            // Safari can get in to bugs depending on too many tests.
            // Better to kill at at the beginning.
            safari.terminate()
            _ = safari.wait(for: .notRunning, timeout: 5)
        }

        safari.launch()

        // Ensure that safari is running
        _ = safari.wait(for: .runningForeground, timeout: 30)

        // Access the search bar of the safari
        // Note: 'Address' needs to be localized if the simulator language is not english
        let searchBar = safari.descendants(matching: .any).matching(identifier: "Address").firstMatch
        searchBar.tap()

        // Enter the URL
        safari.typeText(url)

        // Simulate "Return" key tap
        safari.typeText("\n")

        // Tap "Open" on confirmation dialog
        // Note: 'Open' needs to be localized if the simulator language is not english
        safari.buttons["Open"].tap()

        // Wait for the app to start
        _ = app.wait(for: .runningForeground, timeout: 5)
    }

    func waitFor(element: XCUIElement,
                 failIfNotExist: Bool = true,
                         timeOut: TimeInterval = 15.0) {
        if !element.waitForExistence(timeout: timeOut) {
            if failIfNotExist {
                XCTFail("Could not find \(element.description) within \(timeOut) seconds")
            }
        }
    }

    /// Opens universal link with spotlight
    /// - Parameter urlString: universal link
    func openFromSpotlight(_ urlString: String) {
        // Press home to access spotlight with swipe action
        XCUIDevice.shared.press(.home)
        spotlight.swipeDown()
        sleep(1)

        // Clear whatever on the spotlight
        let textField = spotlight.textFields["SpotlightSearchField"]
        textField.tap(withNumberOfTaps: 3, numberOfTouches: 1)
        textField.clearText()

        // Type the url we want to launch
        textField.typeText(urlString)

        // Note: 'Continue' needs to be localized if the simulator language is not english
        if spotlight.buttons["Continue"].exists {
            spotlight.buttons["Continue"].tap()
        }
        sleep(1)

        // Unfortunately correct cell to search can be change due to spotlight decision
        // Only certain approach is to check cells and find the one matching
        // "https://some-adress..., https://some-adress..." format
        let labelString = ", " + urlString
        for cell in spotlight.collectionViews.cells.allElementsBoundByIndex where cell.label.contains(labelString) {
            cell.tap()
            break
        }
    }

}

extension XCUIElement {
    // Helper function to clear text
    func clearText() {
        guard let stringValue = self.value as? String else {
            XCTFail("Tried to clear and enter text into a non string value")
            return
        }

        self.tap()
        let deleteString = String(repeating: XCUIKeyboardKey.delete.rawValue, count: stringValue.count)
        self.typeText(deleteString)
    }
}
The comments clearly explain what openFromSpotlight function does. The clearText function is a general helper we can use to delete a text in a text field. It is useful to cleanup any old URLs remaining in Spotlight. Let’s implement the actual tests for UniversalLinkTests.
import XCTest

final class UniversalLinkTests: XCTestCase {


    private var app = XCUIApplication()

    override func setUpWithError() throws {
        app.launchArguments = ["UITEST"]
        app.launch()
    }

    override func tearDownWithError() throws {
        app.terminate()
    }

    func test_givenAppURL_whenItsClicked_thenExpectedToSeeAppRunning() throws {
        let url = "https://www.emindeniz.rf.gd"
        UITestHelpers.shared.openFromSpotlight(url)

        //TODO: Verify something!
        XCTAssertEqual(app.state, .runningForeground)
    }
}
The approach we follow is similar to URLSchemes tests. In this single test function, we just passed a URL to our helper function. Then we are expecting it to launch the spotlight and type the URL. After that, as with all the tests, we are asserting. In this simple test, our aim is for the app to become visible to the user after the Universal Link is clicked.
Let’s see the action! 🎥

Although seeing a red result in a test run is not fun, this is a correct result. Remember that we didn’t set up the Universal Link in this project. So when we launch the Spotlight and type the URL it redirects us to Safari. If we set up the Universal Link properly this test will succeed because the app will be visible. After that, you can verify any UI value (texts, buttons, text fields, etc.) as we do in URLSchemesTests.
Summary
We have reached the end of another learning journey in iOS development together. Securing the Deep Link logic is critical for iOS developers. It is logical to create a UI test suite and keep it running rather than manually testing in each release or, worse, not testing at all. Once you have set up the foundation outlined in this article, you just need to populate different test cases to keep your code secure.
If you’d like to view the sample project we implemented in this article, you can find it in this GitHub repository.
Take care till we meet again!


